First Crack at a Genuine Bikepacker
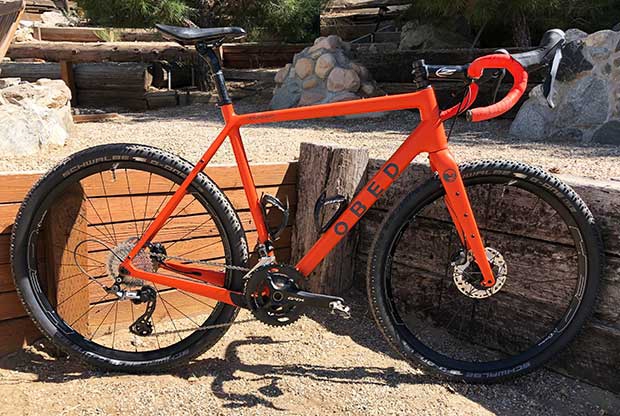
This is both a fun, and a complicated (!), project. When I got the OBED Boundary frame, my instinct told me that this would be the bikepacking vehicle I lacked.
I'm not a confirmed bikepacker, as in, this is what I do. But I’ve done a fair bit of it over the years because if you want to get somewhere and the bike is your method, that’s bikepacking.
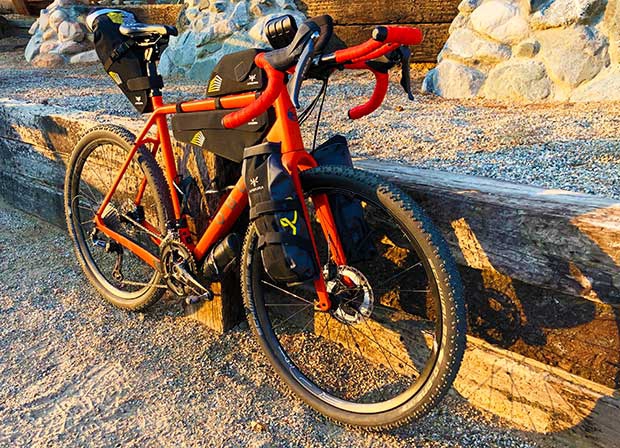
I’ve written about credit card trips, where I packed literally nothing, riding from motel to motel, having previously shipped by parcel service changes of clothes, with tape and call tags in the boxes for return shipment. That’s bike travel, but not bikepacking. I’ve ridden from motel to motel with panniers, self-contained except that I did not plan to bring food, bedding, shelter and a kitchen with me. That’s semi-bikepacking, and for me that counts. And then there have been the true bikepacking overnighters, where I take it all with.
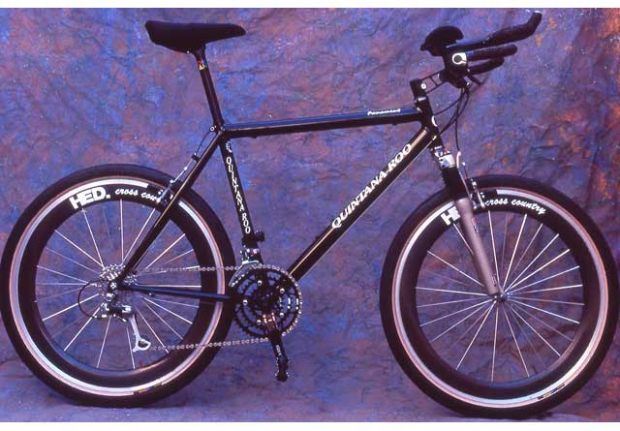
I started with road bikes and panniers, in the mid-80s. In the mid 1990s I made a bike called the Panamint, and you’ll see it in an image below. It was sort of an early gravel bike I guess you’d say – hardtail front-suspended bike with aerobars and 40mm slicks on a 559mm bead diameter (old MTB 26”) wheel. With aero wheels that could withstand offroad, and with aerobars.
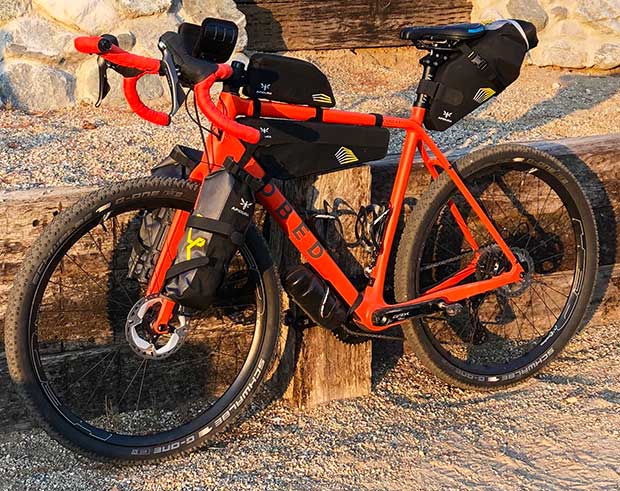
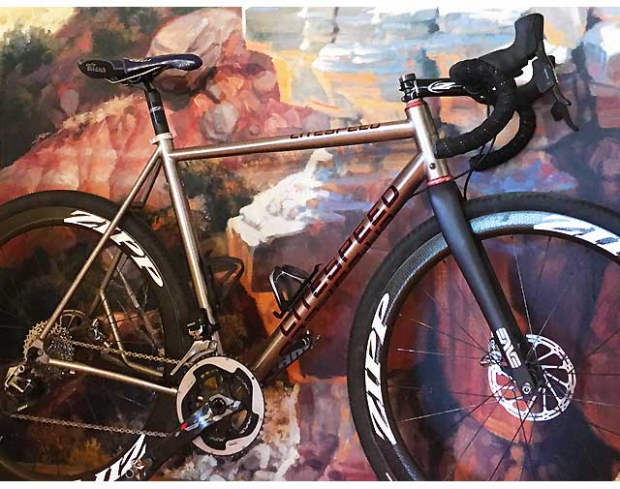
My most recent bikepacker was a Litespeed gravel bike (pictured just below the Panamint) and I hauled a Topeak trailer behind it. That's what you do if you just can't leave anything behind.
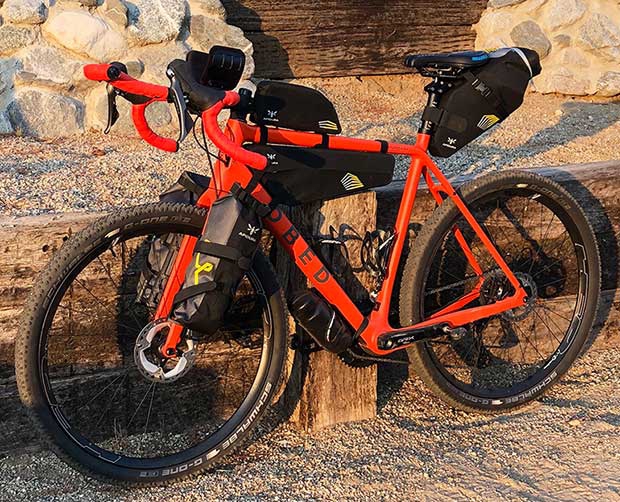
And now this OBED. My goal for this is to be a lightweight point-to-point bike that I can ride on road or off, where I’ll spend no more than 1 night out of doors, or for multi-day trips where I overnight in motels and eat mostly in restaurants. In this current conveyance, as set up in these pics, I’m aiming for the multi-day trip where I’m bringing my clothing for each day, but I’m not hauling a kitchen or sleeping quarters.
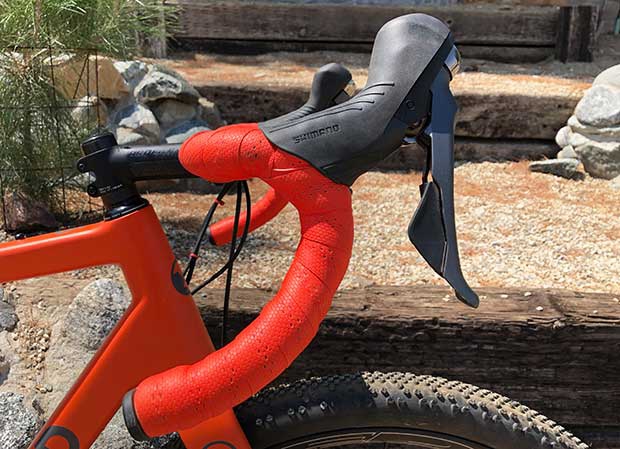
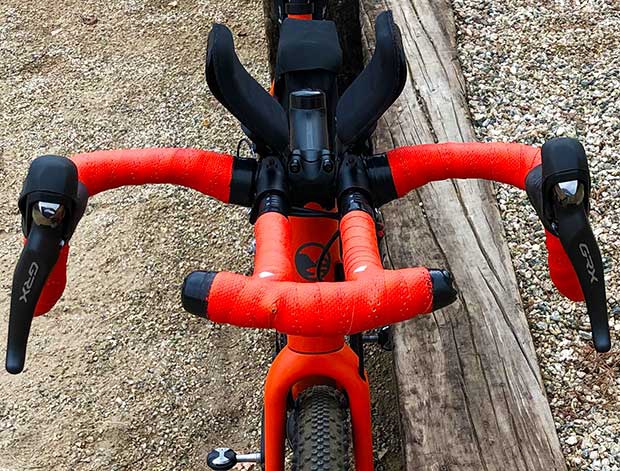
The frame is a size L. I’ve got a 110mm Profile Design stem, -17°, and a Profile’s DRV GMR gravel bar. I explain in the write-up of that bar when I chose that bar – in its rise config – specifically when you put an aerobar on a gravel bike.
Now, the aerobar. I’ve gotten some questions about this. When Diamondback first came out with the Andean, it was in large part a partnership with HED. The bike used HED’s Cobra clip-ons which, tho no longer in production to my knowledge, were a real favorite with road racers who’re using an aerobar on a road bike. This bar had flip-up pads, spring-loaded, so when you were riding out of the saddle the armrests didn’t bite you in the knees, and when riding with the hands on the tops you didn’t have armrests in the way. Of course we’re talking about time trial or prologue stages here, where aerobars are legal.
Diamondback found that the HED Cobras were too high quality to be used as an original equipment bar. Cost too much. So, they made a bar of their own, based on the Cobra design. That’s what this bar is. If a bar is good for road racers, it’s going to be good for gravel racers, because road and gravel offer pretty much the same use, same fit and clearance issues. Now, for sure, I couldn’t just leave it here. I had to do some tinkering. The extensions are just straight ski bends. I cut off most of the ski bend part, then I took an old ski bend extension from another bar, and cut the end off so that I just has a length of extension with the ski bend in the middle.
I took a set of old Dura Ace bar-end shifters, I drilled out the part that holds the shifter proper, because I really only needed the wedge mechanism. I bolted the ski bend to the end of each extension.
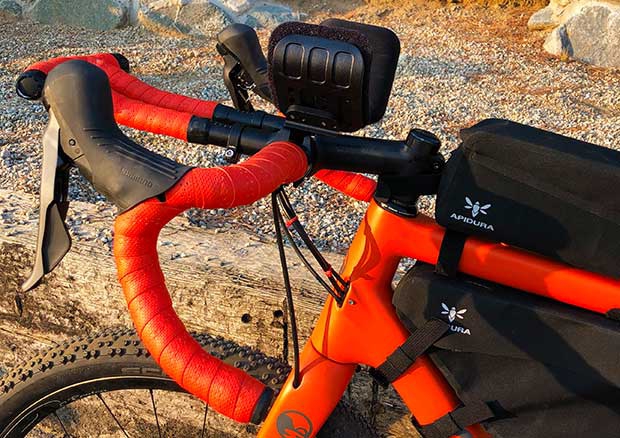
I fear I must have committed some sins with the extension end, but this is what I wanted. I’m still playing around with it, but it’s pretty close. I may come back in a future installment with something different, that is, with a different extension end.
Beyond that, I find the pads position quite narrow. It’s fine for road racers because if you’ve ever made a study of Pro Tour time trial bikes, they are unique in the narrowness of the armrests. But I’m bikepacking, and if I do go 30mph it’s not on the flats, like these time trial specialists. I don’t need the armrests that narrow. I may experiment with an adapter that moves the pads out, but, when I do so will the cradle system handle that cantilever? I don’t know. Better that I try it and report back, rather than you try it and we read about you in our Forum.
You folks know how persnickety I am about bike position, and if there’s one rule that sits up there with Thou Shalt Not Kill (or Steal or Covet), it’s that the aero position and the road position are two discrete positions. Two saddle positions. And this is the problem with putting a clip-on onto a road bike. I knew in advance how I wanted to handle that, because our man Ian Murray (Ianpeace on our Reader Forum) turned me onto this particular Redshift seat post in his writeup of Wilderman a few years ago. Below is a pic of Ian on his Wilderman bike with his Redshift seat post.
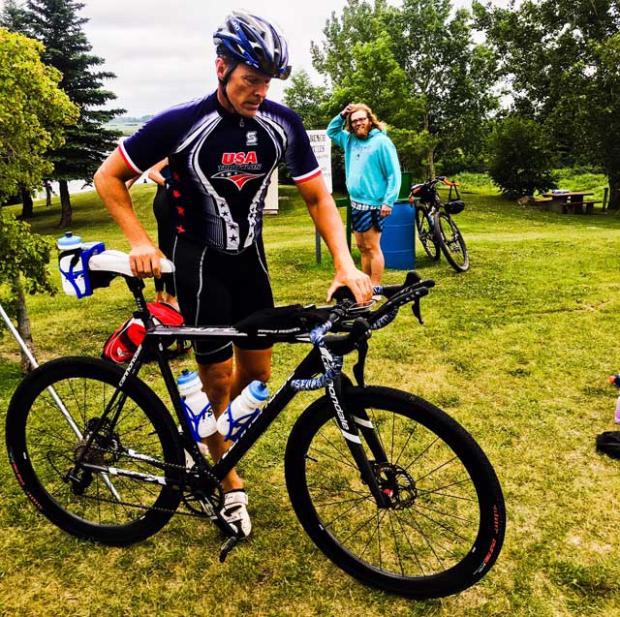
This seat post has a flip-forward position that adds height in the exact measure needed along with moving the saddle forward. So, when I go into the aero position, I move the saddle to its forward position. This takes some getting used to. You must reach back with one hand, grab the saddle flange, and give the saddle a little assist to move forward. When you want to move back, no need. Just push back with your thighs on the saddle’s flanges and it goes back by itself. But when it’s forward, presto, a damned good aero position. This is the Redshift Dual Position post, not its better known suspension seatpost.
The tricky part is that you also have to finesse the pads on these clip-ons. You don’t just move right down onto the pads. You move one arm over the pad, to the inside of the pad, to lay your arm down while also positioning the armrest down. Then the other. So, with this bike, as I have it set up, it takes a while getting used to the whole production of getting into the aero position. As long as I’m not constantly getting in and out, it’s fine.
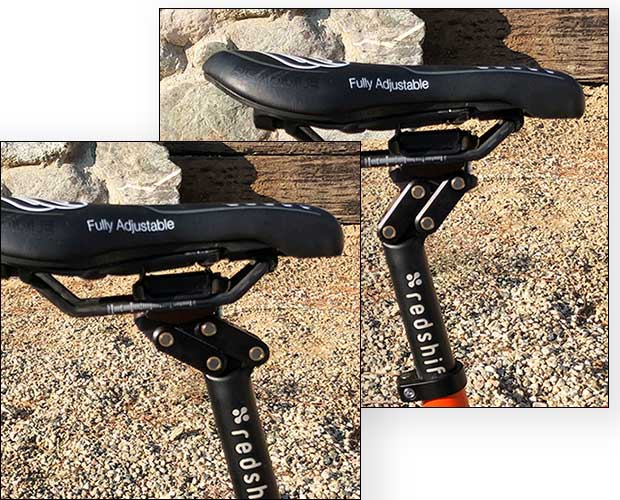
This created a saddle conundrum. I need a saddle that has a good rearward, road position. I need a saddle that has a good aero position. How do I get both positions out of the same saddle? I chose BiSaddle as my first option, because of its adjustability; because it has flanges in the bike wide enough to sit on; because I felt like I could get the nose of the saddle tweaked to my specific need.
So far so good. I’m having very good luck with the saddle for this particular use, both in and out of the aero position. However, there are 3 BiSaddle models, and it is the Sprint specifically – and not the SRT or the Stealth – that I found useful for this experiment. I may change my saddle to something else before this is all over, but if I do I can’t imagine now what that saddle may be, that is, what saddle would outperform the BiSaddle Stealth for this particular bike experiment. We’ll see.
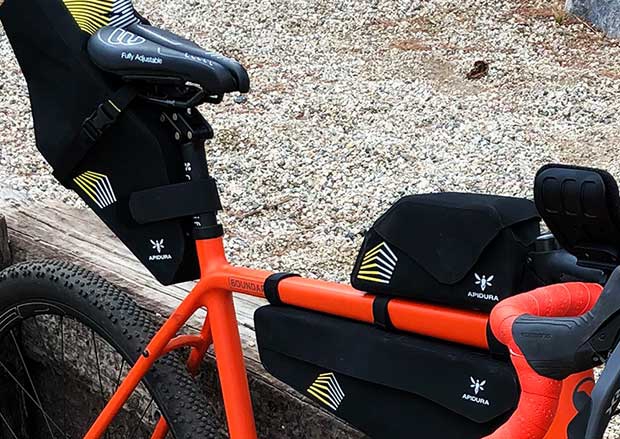
One thing about this saddle. It may look like I ride really far back on the saddle. No. If you look at where the flanges of the BiSaddle Sprint are, in relation with the centerline of the saddle’s rails or the saddle’s nose, they are several centimeters nearer the front of the saddle than are the flanges on a traditional saddle. To get the flanges back where I want them – the flanges are what you sit on – I had to move the saddle quite a ways back. This is not dissimilar to the 5cm or 6cm you have to move the nose of an ISM back, on your tri bike, to achieve the same hips position you would on a traditional saddle.
The packs are from Apidura. Why? I asked our guy Matt Hill (Fredly on the Reader Forum) who knows about this stuff, and it was a short conversation, as in, 1 word: "Apidura." I’ll write more about packs in future installments. I don’t have the handlebar pack on the bike at the moment. I’m still wrestling with how to best use it, and this bike is set up how I’m riding it, and I’ve not got that pack on there yet. There is one pack I’m taking off: the Bento-like pack above the top tube. I have knee and thigh clearance issues with that pack, both in and especially when out of the saddle. However, the frame pack, below the top tube, no clearance problem there. That pack stays on.
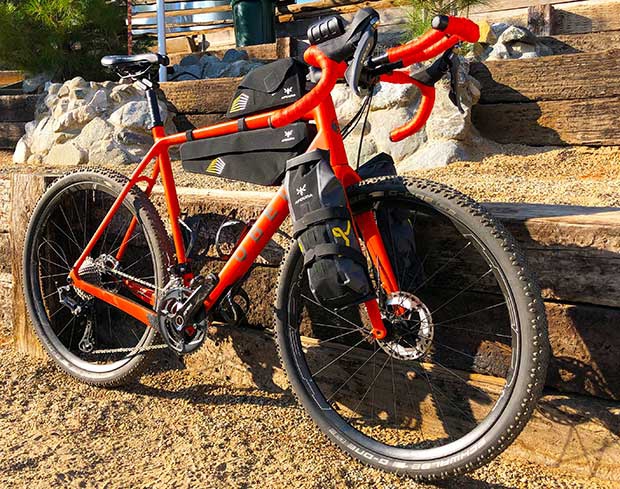
I’d thought I might have trouble with the behind-the-saddle pack, when moving the Redshift post into the aero position. But no. So, that pack stays. I still haven’t gotten to where to put the Garmin Varia on this bike, with that saddle bag there; I’ll have that worked out by my next intstallment.
The OBED frame is a gravel frame. It is great as a gravel bike, and as I have written a number of times (and will again) there is a new geometry out there, for road and gravel, and the OBED Boundary, the frames by 3T and OPEN, and the Cervelo Caledonia, all share a common geometry, whether road or gravel. So, this frame is fully ready, as regards fit, handling, and tire clearance, for anything I might want to do with it as a standalone gravel bike.
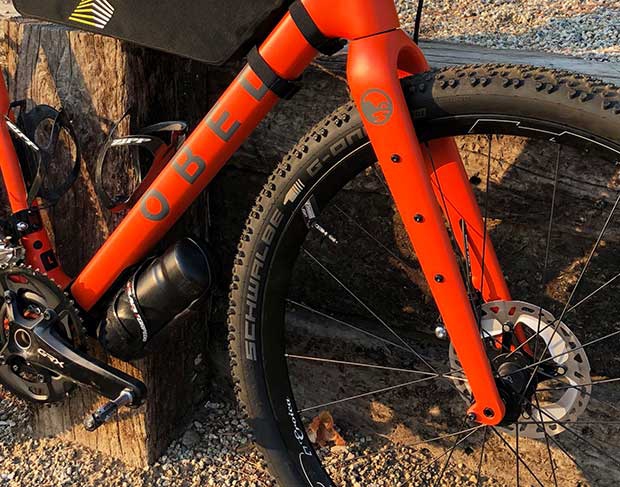
But this bike is silly with bosses. They're all over. They don't hurt anything. You don’t have to use them! But when I saw them, and my other gravel bikes don't have them, that’s when I knew that this was my bikepacker. Above is what the fork looks like before the (Topeak) cageholders that work well with the Apidura fork packs. Among the bosses are the top tube Bento bosses, down and seat tube bosses, and underneath the down tube bosses. This is where I chose to put a very handy every-tool-needed-to-build-a-space-shuttle kit and I don’t recall but I think I may have gotten this from Culprit Bikes, tho it’s the nifty saddle bag toolkit I see on offer at the moment (which I couldn’t use because that space is occupied by the Apidura pack). Below, you can see where I put the toolkit, that fits inside a thing that looks like a water bottle.
I want a go-anywhere bike, and if I’m going to carry around packloads of stuff I don’t want to try to see how skinny a tire I can get away with. Rather, the opposite. This bike has HED Emporia wheels on it, 27.5" (650b), and Schwalbe 53mm G-One Bites. Basically, nowadays, I run 2 wheel options on these bikes I’ve been writing about, because they’re made for a 345mm tire radius whether the designers of these bikes realize it or not. It’s either this wheel/tire that’s on this bike, or it’s a 28mm or 30mm road tire on a 700c wheel. The wheel that these bikes are not made for is a 700c wheel with a 40mm+ tire, and that’s why that combo is not on this bike, nor ever will be. (I believe as bike designers think this thru, some will start to understand my reasoning for this.)
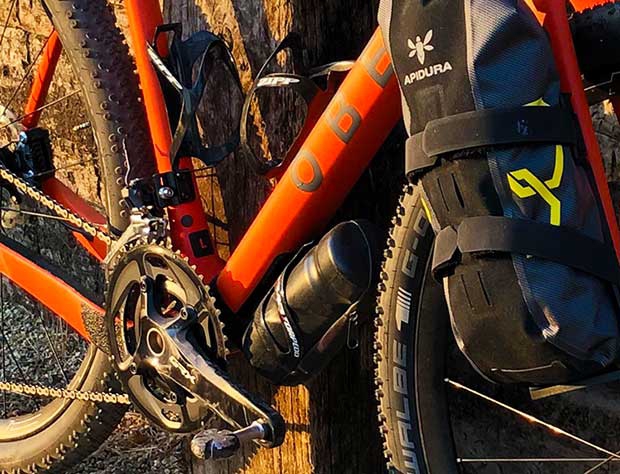
The groupset is Shimano GRX 810 mechanical, 2x, with a 11-34 in the back and 48×31 in the front. This is something SRAM can’t do, this 17-tooth jump in the front. I love SRAM, and I’ve got a SRAM 1x eTap AXS Mullet on my OPEN WI.DE, and a 2x Force eTap AXS I’m riding around on the Caledonia. But SRAM can’t do that 17-tooth gap. SRAM has largely closed the gap on front derailleur shifting by mandating a 13-tooth chain ring differential. It overcomes this through 12 speeds in the back, and long cage rear derailleurs, big cassette ranges. But Shimano has always kind of owned front derailleur performance.
If you look close enough at these pics, and you know what you’re looking at, I had all kinds of problems figuring out where and how the RD should be mounted. I finally corrected it, and got the B screw right, and I’m still having a little issue with the quickness of the RD shifting (the FD shifting is just spot on perfect). But this isn’t a GRX thing. It’s user error. Now that I’ve got the FD I the right spot, that housing that runs from the chain stay to the derailleur is too long, so, I’ve got some work to do on my GRX set up before I’m done. I’ll write about GRX separately; I’ve got both a 1x and 2x GRX bike I’m building (this is the 2X), so more later on that.
I’m running both Speedplay Zeros and Shimano’s MTB pedals depending on where I’m riding this bike. I’ll migrate to the SPDs solely as I get this bike all done, because I’ll ride a pedal that favors offroad. For now, I’m riding this bike mostly on the road as I’m tinkering with the aero position.
That it! That’s the first installment on this experiment. As I was writing this I saw a new post on our Reader Forum thread on your Epic Solo Adventures. There are 3 small blessings that attend our current worldwide epidemiological disaster: that you and I understand the value of racing and of those who produce our events (since we don’t have them available to us now); that you and I understand that our lifelong obsession with swim/bike/run habit does not require racing to validate it; and that the Epic Solo (or small group of friends) adventure is an integral piece to our Magnificent Obsession. This bike, as built – or bikes like it – is a tool for just that.


