Descending

[Written originally in the year 2000, this article has been reworked and updated for today].
I was riding with a group of friends in the Santa Monica Mountains not long ago. I was near the back of the group, as we were all descending at a rate commensurate with a bike race. A lot of the turns on these roads have decreasing radii, that is, they get sharper as the turn progresses. More than once I noted that riders in front of me overshoot the turn, ending up on the other side of the yellow in the middle of a blind turn.
Defensive cycling is not simply a case of protecting oneself against bad or inattentive drivers. It's protecting yourself against roads that are imperfect or badly designed, or built with undesirable but necessary elements because of the terrain (I am keenly aware of this as I write, as I am currently recovering from a broken clavicle and two broken ribs suffered in a crash caused simply by my inattentiveness to the road surface on which I was riding).
Pursuant to this, I'm going to write of a method of descending I prefer, especially on the very curvy roads like those found in mountainous areas, and which has stood me in good stead.
I writing this because triathletes don't descend very well, which is a good and a bad thing.
I should rephrase. On foot, they descend just fine. It's when they're on their bikes that the trouble starts. The bad news is that you lose a lot of time when you descend badly. Worse yet, when you try to go fast with bad technique or bad equipment, sometimes you crash. The good news is there’s time to be gained when you learn to descend properly—time that does not require more fitness, just a little nerve, a little smarts, and some practice.
Sure, there are fancy techniques that involve counter-steering and pretending you're a grand prix motorcycle racer, but the most important things you have to do are easy to learn and fun to practice. The line you take through a turn, and where you brake for a turn, are descending techniques. That’s what we’ll talk about here. How your bike should be set up is an important part of this, but is the subject of another installment.
THE ROADS
Civil engineers have a sense of a humor, I’m convinced. Why, otherwise, would they make roads with off-camber turns? Perhaps there’s a drainage issue. But the laws of gravity and momentum are the same for rainwater and cyclists and you, like the water on the road’s surface, will tend toward the outside of the pavement and into an oncoming car or over the side if you negotiate an off-camber turn incorrectly.
You can bank your bike about 45 degrees. Any more than that and you’ll lose traction. But you’ve got to take the camber of the turn into consideration. If the road is tilted the "wrong" way, you can’t corner as tightly as you’d otherwise be able and you’ll find yourself skidding along the pavement wondering what went wrong.
Another trick they apparently teach in civil engineering school is the decreasing-radius-turn gag. They usually put these just on the other side of blind corners. These are fun turns when you know they’re coming. Mt. Palomar, a 12-mile descent in East San Diego, has a few of these on its upper half. Descending the "Rock Store Climb" on Mulholland Drive (Tour of California contestants rode up this during the 2010 event's final stage) also offers decreasing radius turns.
The problem is when you don’t know they’re coming. In my experience the most infamous road of this type is Highway 190 in the Southern Sierras, descending toward Porterville. This road has more of these blind, decreasing radius turns than I can count. I remember a local restauranteur telling me of a motorcycle café racer that had to be Life Flighted out after missing one of these turns. His motorcycle buddies rode up a week later to fetch his jacket and helmet, and one of them had to be transported out! Roads like this are why I prefer a line in which you’re attempting to hit the inside tangent of the road just beyond what you perceive will be the fulcrum or moment of the turn. I’ll describe this in detail below.

THE LINE
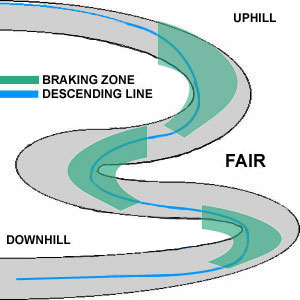
You've got your existential descenders. Those who live for the moment: "What, me worry?" If you always get left behind on descents even though you "go for it," you are probably in this group whether you realize it or not. The graphic adjacent shows a fairly typical (but in my view not ideal) line to take in a turn. This turn makes the widest arc possible, except when you have to shorten your arc to set up for a subsequent turn. Therefore, you approach the turn from the opposite side of the lane. Notice I said opposite side of the lane, not opposite side of the road! Even when I'm on a very rural road that I know well, and I can see what’s ahead, I'm reticent to use the whole road. In any case, I do not take chances with cars, and I can't imagine why you should either.
Your intent, using this typical technique, would be to cut the corner at its fulcrum, and then use the runout to continue your wide arc. Plenty of very good cycling instructors teach taking this line, and it's an acceptable way to descend.
As I said above, however, if you're on a particularly curvy road you might need to abort using the runout on the lower part of the curve to set up for the next curve. The rule is, always be set up for any curve in advance. This means that on a technical descent, if there are a lot of curves close together, you might have to think ahead and plan your turn with the following curve in mind. For this reason, and because triathletes often ride weight-pitched-forward steep-angled bikes, I suggest another line to take, which I will describe below.
Incidentally, the graphics you see here are obviously just for illustration and do not take into account things like the yellow line, and traffic coming the other way. What you see here is representative of a lane, not the whole road.
THE BRAKING ZONE
Before we talk about when you should brake, let's spend a moment on how you should brake. Just as with a car, there is a gradient between fully on and fully off. The dynamics are very similar. Resist mightily the urge to slam on your bike's brakes, because your bike has no anti-lock braking system. If you lock up your brakes, almost certainly you're going to go down. So, learn how to feather your brakes, to finesse them. Learn how long it takes to stop, and how much longer it takes as the pitch of the descent increases. Learn where to place your body weight over the bike as you brake, and that the harder you brake and the steeper the descent, the more you need to move your weight toward the rear of the bike. And finally, realize that if you ride in a group your braking habits matter to those riding behind you. On a bike, just as in a car, those in traffic are affected if you employ herky jerky braking techniques.
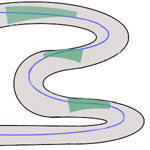
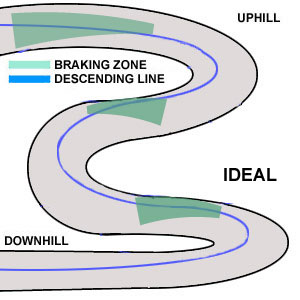
You'll notice this on the graphics presented, and note the difference in braking zones in the two illustrations. Just like everything else in life, preparation is the key. You should be doing all, or the bulk of, your braking in advance of the turn (as in the graphic below), less so or not at all during the turn (as in the graphic above). By the fulcrum or moment of the turn you should be feathering the brakes, or off them completely and picking up speed. So much about descending fast is about the speed you carry out of the turn, and decelerating before and not during the turn earns you that speed.

TECHNICAL DESCENTS
I descend best on roads I know. "Of course this is the case," you might say. But I’m very conservative on roads I don’t know. I resist taking blind corners quickly on an unfamiliar road, because I don’t know what’s on the other side. There might be road debris, a decreasing radius to the turn, or potholes, or dogs, who knows what? Because of off-camber and decreasing radius turns; because of blind and unknown roads; and because i prefer to brake primarily in advance of a turn, and less so during a turn; I prefer a line in which you’re attempting to hit the inside tangent of the road just beyond what you perceive will be the moment of the turn (shown in the adjacent illustration). In this case, the point where the rider's line is tangential to the inside of the turn is just slightly past its moment. On a curvy road this will give the rider a better setup for his next turn. This is nuanced, and takes some thought and some practice, because the rider is actually aiming for a point he may not even see prior to the turn itself.
This is the way I descend. I do most, and often all, of my braking before the turn, and I aim for the inside of the exit of the curve, not the inside of the fulcrum or moment of the curve. Because of this I almost never find a need to brake hard during the turn.
HIGH SPEED DESCENTS
I think the main thing holding people back on high speed descents is the fear of flat tires. That's a legitimate worry, because if you get a flat at high speeds you might fall hard. But you aren't going to get as many flats while descending. This is based on the first person account of one man's riding over a thirty year period. I don't think my experience is just a matter of luck. While I can't be sure, I suspect it is because no part of the tire contacts the ground for very long during a high-speed descent, and so is not as prone to a penetration by a thorn or a piece of glass. I'm just guessing.
But, let’s face it, it’s a calculated risk. Yes, I guess I like to go for it on descents, but only on technical descents, not high speed descents. On technical descents one is not normally reaching speeds of more than 35 or 40 miles per hour. I have no interest in high speed, straight, tuck descents where I'd be going 50mph+ (and I never tuck anymore, neither on my road bike nor on my tri bike—an act downright foolhardy on a tri bike, with all that weight cantilevered in front of the steering axis). There is little skill involved in straight, high speed descents and I, personally, take no pleasure in the thrill. I'll reluctantly do it in a race, but not in training.
My reticence notwithstanding, let’s talk for a moment about these queasy high speed descents. I suppose the fastest I’ve ever gone on a bike is about 60mph, and it was during a bike race in the Lake Tahoe area in the late 1970s. A semi-truck gently passed a couple of us as we were tucking down long, straight, high-altitude Spooner Summit toward Carson City. One thing led to another, and we were soon taking high-speed gravel shots in our Vuarnets while sniffing the truck’s right-side mud flap. This was some decades ago when I had a more three-sheets-to-the-wind approach to things. Nowadays, if I top 40mph my hands are on the brake levers, prepared to squeeze.
If you’re behind a group of guys at 45mph, you’ll soon find yourself whipping by them at 50. But that won't last. Soon your 50 will become 45 and they’ll whip by you at 50. As a group, you’ll go faster. But you won’t be able to drop the group. Me? If I’m in such a group I prefer to stay 5 or more lengths behind and keep my hands on the drops. When the gap compresses and I sense I’m going to close to the group, I sit slightly up and make a bit more of a sail out of myself so that I slow down. When the hill bottoms out and they slow down, then I close the gap. That way, I can keep my hands where God intended them to be when he invented road-race handlebars.
If you do flat during a high speed descent, don't panic. Brake only with the wheel that isn't flat. It's a good idea to practice remembering exactly which lever brakes which wheel. It sounds sort of stupid to say that but it's amazing how, when you get a flat at high speed, you just can't remember.
The final part of descending well is a discussion of how your bike is built and prepared. There are certain things that, by themselves, tend to make a bike a better descender. Long chainstays and low bottom brackets will cause your bike to carve a turn with confidence, and you'll enjoy the way a bike built like that descends.
But the most important thing is to have one's weight centered over the bike. If you feel that your weight is too far forward when you're in the middle of the curve, that's a problem you might want to address. We’ll talk about that in a future installment, specific to how the front end of your bike is set up.
With descending, as with everything else, practice makes perfect. But there is one immutable fact about the art of descending and the practice of such: You've got to go up before you can come down. This makes practicing descending uniquely well suited to making you a better climber.


