Translating fit specs to bike specs
You'll want to follow the articles in succession, starting with Intro to the F.I.S.T. Method:
1. F.I.S.T. axioms
2. F.I.S.T. protocol
3. Measuring conventions
4. Seat height
5. Cockpit length
6. Hip angle
7. Armrest drop
8. Tools of the trade
9. Your bike's "waistline"
10. Translating fit specs to bike specs <– You are here
You should've read our article on Your bike's waistline prior to this, if you're following in order. Our series begins here.
So let's say you have these coordinates "in space" that identify your optimized fit. What do you do now? It depends what you want to achieve. If you have an existing bike, or you have a built bike sitting on a retailer's floor that you're intending to purchase:
1. Set the seat of this bike up so that the saddle is "so many" centimeters high, and its nose is "so many" centimeters in front or behind the bottom bracket (according to your "points in space" arrived at during your bike fit).
2. Make the needed changes in stem length and pitch to match the cockpit distance and armrest drop you got through your fit session — take out or add a spacer or two, or whatever — and, presto, you've made the bike fit you properly.
Okay, that's how you retrofit an existing bike. But there are other things you might like to do. For example, you might want the frame to be made custom to fit your "points in space" coordinates. Who should make this frame? Do you want a QR TiPhoon, or an Elite, or a Guru or Yaqui? Now that you've got your fit coordinates set, how do you let these companies know what your optimized bike geometry ought to be?
I ask this because if you give one of these companies stats like saddle height and set-back, armrest drop, cockpit length, they won't know what to do with them. Well, there's one who will, and that's the folks at QR. They can actually take FIST stats and "back into" geometry. But this method requires a bit of alchemy on their part and is designed for fitters of varying abilities. There's a more precise method out there for those fitters who have the right tools, which both QR and any other bike maker can use. The problems with generating a proper bike fit for triathlon are these:
1. While most road bike fit systems tell you where you want to be positioned, FIST asks you where you want to be, and will stipulate to your decision as long as your requests fall inside a tight set of parameters. Because of this, a set of core and lever dimensional inputs cannot yield a geometry, because one input is lacking: do you want to ride fore or aft of the bottom bracket?
2. If there were no aero bars, life would be easy. But triathletes are all over the map on what stem pitch they prefer, and aero bar companies are all over that same map as to pad placement versus the pursuit bar. This adds logarithmically the variables to consider when settling on the proper bike geometry.
But there is a workaround to this. Hearken back to the fit bike, or "position simulator" if you prefer. The trick is to reduce as many variables as you can that represent a multiplicity of spatial options. If a fitter places the aero bar his subject is going to eventually ride on the position simulator, he doesn't have to consider all the aero bar options out there and the spatial relationships each uniquely has between its armrest and the base bar upon which it sits.
Further, if he places the stem on the fit bike that conforms to that which a person ought to ride considering his stature, and he uses a stem pitch that he intends to use on the actual bike to be custom made, then he's removed this variable as well.
If this protocol is used, once the subject is positioned on the simulator, you've removed all guesswork above the frame's head tube. But still, how do you determine this frame's geometry?

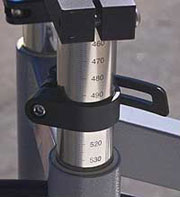
You'll remember Ves Mandaric's fit simulator and the gradations on its telescoping pistons and horizontal plates. The idea behind these is to give you a reference point to the bottom bracket. In the photo adjacent, you'll see "530" visible as the number just above the piston's stantion. This means the top of the plate on which the adjustable stem sits is 530mm above the plane of the bottom bracket (this is the frame's "stack"). You now have about the first of three necessary measures.
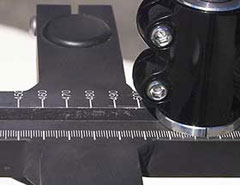
The horizontal plate's gradations will tell you how far in front of the bottom bracket the stem is. In the case of the photo adjacent, you'll note that the stem is sitting 5mm above the plane of the horizontal plate. You'd need to normalize this for the measure above the top of the head tube you intend your bike to have.
In other words, the intended custom bike is going to have an integrated headset or not, and if not, then you need to subtract a bit of head tube to make room for the external headset cups. If you want to have 15mm of spacers, you need to adjust for those. You then adjust your stack appropriately. In any case, the reading on this horizontal plate, right underneath your stem's connection to the virtual steer column, is the frame's "reach," and tells you how many millimeters the top of the head tube is in front of the BB. What we've done is reduced the frame's length and height to a set of X/Y coordinates, that is, vertical and horizontal coordinates.

Now you have two of the important fit-specific numbers needed to build the right custom bike. These terms "stack" and "reach" might be vaguely familiar to those who follow the tech articles on this site. I wrote an article three and a half years ago introducing these concepts. In this article, as well as the intro to geometry and 07 geometry articles mentioned above, you'll find that I keep making reference to the geometric specs that refer mostly to fit, versus those that affect handing. This should be easily apparent, because the bike's chain stay length has nothing to do with fit, does it? And what head angle you use also does not affect fit. But they both affect handling. Stack and reach are what you need to determine how a bike will fit.
You need a third parameter, however, and this is the bike's seat angle. A few years ago this was an almost unnecessary parameter to consider, because you could always figure out a way to get the saddle where you wanted it. But these days bikes tend to have seat posts you can't change out, they're part of the frameset. So, you do have to consider this. So, you run a SmartTool through the BB and the center of the seat post clamp and you've got the seat angle of the bike you'll be riding. Now the astute frame builder has all he needs — in terms of fit specs — to custom build your bike.
Keep on thing in mind. Depending on the custom bike maker, the seat post clamp may be set right on top of the seat tube and post, or a cm behind, or a cm in front. The actual seat angle of the bike itself may be a degree steeper or shallower than the virtual seat angle of the bike. Taking QR as an example, if you want a custom TiPhoon, and your perfect seat angle measures 79 degrees from the BB through the center of the seat clamp, your TiPhoon should probably be built with a 79.5 or 80 degree seat angle, because the TiPhoon's seat clamp is offset about 1cm behind the centerline of the seat tube.
But why don't you use an X/Y measuring system in the rear of the bike, since you're using it in the front? I can ask a frame builder what the "X/Y" is from the BB to the top of the head tube, and for every size bike he'll give me a specific answer. But if I ask him the X/Y from the BB to the seat post clamp, he can't tell me that, because it depends on the height of the saddle. So, in the rear I find it easiest to use an angular dimension.
But how will the frame builder know how tall to make the seat post? Easy. He already knows where the top of the head tube is, because you've precisely positioned this for him by giving him the stack and reach. He just needs to project back in a straight line (that's the bike's top tube), and there you have the seat tube terminus (since tri bikes always have shorter head tubes than road bikes, you won't need to worry about standover height, and can just bring the top tube back in a horizontal line).
How does this work in real life? Any frame builder with a parametric program for framebuilding (framebuilders all have these) can extrapolate a geometry out of stack, reach and seat angle. If you take my idea of the best production geometry as an example, in a size I would ride (historically the 58cm version of my idea of optimized production tri geometry), that geometry generates a stack of 560mm and a reach of 460mm. What is the top tube length generated by this stack and reach? It depends on what seat angle you use. Personally, I would use a steeper angle than the 78.5 degrees I recommend bike companies use in production, because I ride steeper than the average bear. My preference in a top tube is about 56cm as opposed to the 56.5cm production top tube length I recommend on that 58cm size. So, my own perfect custom geometry would call for an 80 degree seat angle, and my custom frame's reach would increase to about 47cm. I like that 145mm head tube length called for in my optimized production geometry, and the 7cm of bottom bracket drop, so I'll stick with the 56cm stack.
So my perfect custom bike would have a stack and reach of about 56cm and 47cm respectively. But so far we're talking about fit specs only. Now there's the handling-specific specs to consider, and this is where you either have to rely on the framebuilder's expertise in how tri bikes ought to handle, or you can use my article referenced above on the sorts of techniques used by production bike makers (as well as my own ideas of handling-specific bike specs). Accordingly, choose chainstay lengths, front/center and wheelbase specs, steering geometry, to suit.
You do not need Mandaric's fit bike to generate stack and reach. Serotta makes an X/Y tool that also does this. Making an X/Y tool would not be that hard, and somebody probably ought to make one for sale to those who have fit bikes that don't automatically give you X/Y dimensions.
What about production bikes that might work instead of getting a bike custom made? I anticipate, within a very few weeks, publishing another article with the stack and reach of every meaningful tri bike company, throughout their line and for each size. I already have some of these stats databased. Using my own 58cm size as an example, QR's new 2007 geometry says its 58cm Kilo and Tequilo have a stack and reach of 54.5cm and 45.5cm respectively. Alternatively, its 61cm size has specs of 57cm and 47cm. Since my own "perfect" specs would call for 56cm and 47cm respectively, it's apparent that QR's 61cm is actually very close to my perfect size — the head tube is 1cm taller than perfect, and the top tube is perfect. That's certainly something easy to accommodate by moving a 1cm spacer out from underneath the stem.
Cervelo was the first company to start publishing stack and reach dimensions, fully 3 years in front of anybody else. Should one consider its geometry chart, one sees that the 61cm P3C Cervelo has a stack and reach of 56.4cm and 45.4cm. Again, this is very close to what I'd need. My stem on a Cervelo needs to be 1.5cm longer, and I'd need to take a 5mm spacer out from under the stem, and I'm there.
Then there's Felt's new geometries for '07. In my size, the seat angle is 78.5 degrees, so I can get my 80 or so degrees by moving the saddle forward on the rails. The stack and reach for its tri bikes in 60cm are 56cm and 46cm. My "perfect" spec, remember, is 56cm and 47cm. So, I add a cm to the stem I'd normally ride an on any '07 Felt I'm good to go.
Once all the stack and reach dimensions for all the popular tri bikes are posted here, it ought to be easy to see what bikes will work for you and which one's won't. Just keep in mind that you can't go to a FIST session, get your stack and reach numbers, find corresponding stack and reach specs of current production bikes, and jump on these bikes and ride off happy. Assuming your fit was executed with your own preference of aero bar and stem config, you'd need to take your Cervelo, Felt, QR, Giant, Litespeed, and stick your front end on that production bike in order for it to fit the same. And, of course, that bike's seat angle must be such to accommodate the angle you'll choose to ride.
What I hope to express here is that there is a path from "points in space" to finished bike geometry. But the path requires a fitter with state of the art tools, and a lot of expertise. When the article databasing the stack, reach and seat angles of each of our sport's production tri bikes is published, I'll also publish stack and reach of my optimized production tri geometry. I'm doing this for a variety of reasons, and one such reason is a sort of "buyer beware." If you're getting a custom bike built, I would recommend you look at how much its geometry differs from the production geometries of the bikes built close to your desired seat angle. If it differs a lot, then you might want to inquire why before you buy.


Start the discussion at slowtwitch.northend.network