What’s in a tube?
An inner tube is a doughnut shaped “bladder” that goes inside a bicycle tire to contain the air pressure. The air pressure inside this bladder creates an “air spring” that has some very advantageous properties for use in a pneumatic tire. This air spring has a nearly perfectly linear force vs. deflection curve (for the typical deflections found in the contact patch) and has extremely low (i.e. nearly non-existent) energy losses. These properties give the pneumatic tire an advantage over solid tire materials since it allows the tire to act as an effective suspension for the bicycle.
Unlike modern tubeless automobile tires, most bicycle tire casing materials are typically not “air tight” and thus require the use of a separate inner tube. Some bicycle tires, such as certain tubular brands, and “tubeless” road and mountain bike tires don't require the use of a separate inner tube, but instead the casing has been designed to either be thicker or to have a butyl rubber chamber integrally embedded in the tire casing. Since the vast majority of bicycle tires used in timed cycling events use an inner tube, the following discussion will outline the pros and cons of the two main types of tube materials available so that the reader can effectively choose the type of tube that meets their particular needs the best. Even if the reader uses tubular wheels and tires, this discussion will be helpful for them to choose the particular brands/models of tubular tires since the type of inner tube material sewn into these tires varies with the particular tire.
BUTYL INNER TUBES
The vast majority of inner tubes sold for bicycling purposes are made from butyl rubber (full name “polyisobutylene”). This material is a synthetic rubber and is the most popular material type due to a combination of properties that tend to be the best overall compromise for training, racing, and overall general use. Butyl tubes are generally molded and vulcanized in a single piece construction that eliminates joining seams.
Pros
* Inexpensive
* Good air pressure retention – low air diffusion over time
* Durable
Cons
* Relatively inelastic – higher losses from flexing
* More susceptible to “pinch” type (i.e. “snakebite”) flats
LATEX INNER TUBES
A more specialized tube material that's typically used in “high performance” tubular tire models and is available for use in clincher tires is a form of natural rubber known as latex. This highly elastic rubber material is the same type of material as is used in common party balloons and some types of surgical gloves. The main advantageous feature of this material is it's elasticity, or it's ability to be stretched, or deflected by large amounts and then return to it's unloaded state with very little hysteresis, or energy losses, due to the deflection. Because of this property, the use of latex tubes in a bicycle tire tends to give the combination of tire and tube a lower overall rolling resistance as compared to the same tire with a butyl tube. Depending on the tire, the rolling resistance can be lowered by as much as 10-15%. This can result in a power savings of ~5W for a typical rider, which is not an insignificant amount. For example, over an Ironman distance bike leg (180 km) this would result in a time savings of ~1-1/2 minutes.
Pros
* Highly elastic – low energy losses from deflection
* Good resistance to flats from impacts (“snakebite” flats)
Cons
* Relatively expensive – typically 2X-3X the cost of butyl
* Higher air diffusion – need to check pressures more often
* More sensitive to installation technique for clinchers
Due to their higher cost and relative sensitivity to installation technique and rim tape condition, latex tubes are typically reserved for “race wheel” use.
TIRE PRESSURE
One of the most frequently asked questions about tires is “What pressures should I run in them?” Well, the short answer is: “That depends.” Yes, I know that might sound flippant, but it really is the case. It's also helpful to think in terms of a range of pressures that one should use, rather than a single “optimal” pressure…mostly because over the duration of a timed cycling course, some of the variables that the pressure “depends” on can change.
Before talking about choosing a tire pressure range, let's examine some of the effects that tire pressure has on the various “jobs” that a tire is designed to perform. Increasing pressure tends to lower the rolling resistance of the tire, increase the load carrying capacity (without bottoming, or “pinch flatting”) and lessens the cornering ability of a particular tire. Why do these things happen? To understand this, one needs to look at the effects of increasing pressure on the tire system, and in particular on the contact patch of the tire.
If you recall above, the pressure in the inner tube of a bicycle tire creates an air spring. Higher pressures increase the “spring constant” of this spring, in other words, how much force needs to be applied to deflect the spring a given distance. On a tire, this means that for a given wheel loading, the tire will deflect less at the contact patch. Less deflection at the contact patch translates into lower energy losses due to flexing the tire materials.
Additionally, the smaller contact patch also lessens the “moment arm” of the reaction forces in the leading and trailing portions of the contact patch, thus also lessening the rolling resistance (see Article I of this series for a deeper explanation of this point). The stiffening of the air spring with increasing pressure also means that a higher force is required to deflect the tire a given distance which leads to a better resistance bottoming of the tire against the rim on large impacts.
Lastly, the stiffer “air spring” leads to reduced cornering ability due to the smaller contact patch resulting in less tire in contact with the pavement and the stiffer spring making it more likely that the tire will “skip” when cornering on bumpy surfaces.
So then, if increasing pressure decreases the rolling resistance of a tire, why isn't it recommended that one run the highest pressure possible for timed cycling events? Well, that would actually be the preferred recommendation if the particular timed cycling event was held on a perfectly smooth surface. On typical pavement, or even on track surfaces that are considered to be VERY smooth, in reality the preferred pressure is going to be something well short of the maximum pressure capability of the tire, especially for those of tubular construction, which by design can safely handle higher pressures. In order to understand why this is so, we need to look at one more “job” that a tire system performs, which is actually one of it's most important, and that is the job of providing a suspension system when riding over non-smooth surfaces.
When a tire encounters road surface roughness, this causes the tire deflection at the contact patch to vary in amplitude. The same tire properties that result in low rolling resistance on a perfectly smooth surface are the same properties that handle this varying amplitude case. One way of thinking about it is that the smooth surface condition is a case of the contact patch undergoing a fixed amplitude distortion, while the rough surface condition is a variable amplitude case. The reason that pneumatic tires perform so well for vehicles on less than perfectly smooth surfaces is that the “air spring” formed within the tire is of a low enough stiffness, and the flexing of the tire materials results in such low energy losses, that the majority of the energy input caused by the surface roughness is merely absorbed in the leading half of the contact patch and then nearly completely returned to the road surface in the trailing half.
But, what happens when the stiffness of this air spring is increased by increasing the air pressure? At some point, and this varies depending on the particular tire, the load, and the road surface, the stiffness becomes high enough that some of this energy, instead of being absorbed/returned at the contact patch, is transmitted into the wheel and eventually into other portions of the bike. Since the rider of a bike contacts it in 3 spots, 2 of which can be described as “squishy bits”, this energy is then dissipated (and lost as heat) in the rider itself. That “lost” energy cannot be returned to the road surface and therefore represents an additional “load” that the rider needs to overcome.
When thinking about tire pressure and what is "fast", it helps to think of it in terms of a "resistance to forward motion" rather than just thinking about the rolling resistance of the tire itself. As we've seen above, increasing pressure inside the tire decreases the rolling resistance of the tire itself, and this fact has been observed in tests of rolling resistance vs. tire pressure on smooth rollers. With increasing pressure, the rolling resistance drops at a decreasing rate until at very high pressures it's basically a flat line. So, does that mean that increasing pressure in a tire lowers the rolling resistance of the tire on a rougher surface as well? The answer is: “Yes…but..” The rolling resistance of the tire continues to decrease with increasing pressure on rough surfaces as well, BUT at some point the increasing pressure stiffens the “air spring” so much that the increase in transmitted energy loss overwhelms the decreasing rolling resistance of the tire, with the result being that the actual " resistance to forward motion" starts increasing.
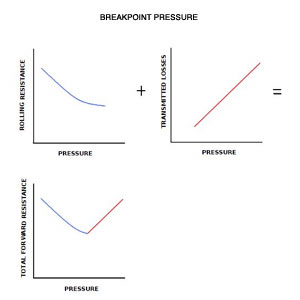
The net result is that above a certain pressure (what I like to call the "breakpoint pressure") higher inflation pressures make a rider slower for a given power input to the pedals. Adjacent is a simplified schematic representation of this effect.
Very little data is commonly available that shows this effect. Mainly out of curiosity about whether or not this effect was measurable, and to what the magnitude of the effect was, this author undertook an experiment "on the road" armed with a PowerTap power meter and a method for determining the Crr (coefficient of rolling resistance – actually, in this case the "resistance to forward motion" proportional to velocity) illustrated here.
In short, this method requires one to assume a Crr and solve for the aerodynamic drag coefficient (CdA), or the opposite (as in this case) and assume a CdA and solve for the Crr. In actuality, what I did was hold the CdA "fixed" by making sure my position on the bike was identical for each run and I then varied the tire pressures. The outcome of this analysis is shown in the following plot, which reveals the “breakpoint pressure” for the particular tires tested, with the particular wheel loading, and the particular road surface roughness of this test.
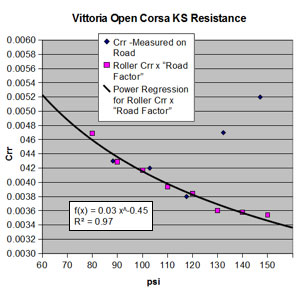
One quick “takeaway” from the above plot is that if one hasn't identified the "optimal" pressure for their particular setup, then it is far better to "err" on the side of too little pressure, than to "err" on the side of too much! Also plotted on that chart is the Crr vs. pressure for the exact same set of tires on a smooth roller setup. As you can see, below the "breakpoint pressure" the curves of both the roller test and the road test follow the same basic shape. It's only once the inflation pressure increases to the point that energy is unduly transmitted through the tire and into the rest of the system that the "resistance to forward motion" increases rapidly.
A good starting point for tire pressures is to follow the recommendations of the tire manufacturers. Most will give both a recommended pressure that's less than the maximum pressure, and some give fairly detailed recommendations based on rider weight and conditions. Zipp has an excellent chart for it's Tangente tires (made for them by Vittoria) that's a good one to follow even if your tires aren't Tangentes. For riders in the 125-175 lb range, that would mean tire pressures from 110-120 psi. Personally, I prefer to run ~5-10 psi less than that, especially if there's some amount of roughness to the road conditions. As stated above, being slightly underinflated for the conditions is less of a detriment than being slight overinflated.


